


It IS Rocket Science: An Integrated S.T.E.M. Lesson
Setting up your S.T.E.M. Lab was no easy task, but now that’s behind you. Now what are you going to do with it? You might find that trying to create the integrated S.T.E.M. lessons is an even tougher challenge. As teachers we tend to focus on one discipline – either out of familiarity or based on our certification. But S.T.E.M. requires spanning across science, technology, engineering, and math. As part of this series, we will assemble some truly engaging lessons for your S.T.E.M. lab on a budget guaranteed to engage your students and impress your colleagues.
In this blog we will explore the exhilarating hobby of model rocketry. You will need a classroom kit of model rockets. (Estes Alpha III’s are recommended) and the appropriate engines (size A), as well as the launch pad and controller. You can check with your local hobby store or purchase through an online retailer. It doesn’t hurt to ask for an educator discount – especially when buying in bulk. This project will take anywhere from 3-5 days depending on the age of your students (grades 4 and up) and how in-depth you decide to go with each integrated discipline of the lesson.
Day one will be spent building the model rocket. You will want to start by distributing and unpacking the model rocket kits with your group. Use caution as some of the parts are tiny and can be easily misplaced. Follow the step-by-step directions included with the kits. It is good practice to build the rocket along with your students. Take your time and walk the room while showing the students your model and make sure they are completing the step properly. If there is a step that requires making an incision in the body of the rocket with a hobby knife, do this step for the students to avoid mishaps. Have the students take care to tuck the recovery wadding and parachutes neatly into the body to ensure a safe landing of their re-usable model. Since all the rockets will look identical upon completion, have your class decorate the fuselages with decals and write their names on the body or the fins.
Day two is launch day. Prior to the launch, check with town officials (namely the fire department or some other safety organization) and notify them of your launch. Locate and reserve a park or open field clear of trees and at least 200 feet from houses. These rockets can reach about 150 feet, but the wind may cause them to drift on the way down. Stand by with the student whose turn it is to launch. Have the others on the sideline to give the countdown (“ten, nine, eight …”) and remind them to keep alert for descending rockets. This is truly the most thrilling part of the lesson. Your group will definitely enjoy the rush of the rocket when the engine is ignited and the thrill of tracking its altitude.
The remaining days will be spent on the S.T.E.M. integration. So let us now investigate how the rocket fits into the branches of S.T.E.M.
Science
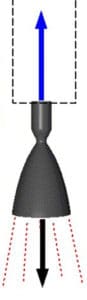
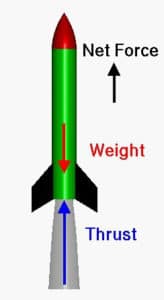
The science of S.T.E.M. is a great way to discuss Newton’s Laws of motion. The first law states that every object is in a state of rest or a state of motion unless acted upon by another force. So when our model rocket is sitting on the launch pad, it is at a state of rest. When the engine is ignited, its thrust increases from zero. This is an opportunity to ask students to think about what would happen if they were riding a bike or skateboard and hit a curb (demonstrating Newton’s First Law). While the rocket is in flight, it is illustrating Newton’s Second Law – that the acceleration of an object is dependent upon two variables: the force acting upon the object and the mass of the object itself. Keep in mind that the rocket actually becomes lighter as it travels upward due to the fact that it is burning off its fuel. Ask your class why heavier objects take more force to move them than lighter objects. Now examine the rocket engine. When the rocket is ignited, hot gasses are forced out the bottom of the rocket. When this happens, the rocket is pushed upward. This defines Newton’s Third Law – for every action, there is an equal and opposite reaction. You can have students demonstrate this in your classroom by inflating a balloon and releasing it.
Technology
Now let’s examine the technology of the rocket. Dissect a model engine to reveal the inner-workings. The hot gasses are produced when the propellant is ignited. The gasses flow out of the rear nozzle of the engine and thrust takes place. The engine will be marked with a number to indicate the number of seconds of thrust time. There is also a delay charge included in the engine. While the delay charge is burning, no thrust is taking place, but the rocket is still approaching its apogee (highest point). The delay time in seconds is indicated by the second number. After the delay period, the rocket will fire its ejection charge. At this point, the cone will pop and the recovery chute will deploy.
Engineering
The engineering part of this project consists of the components of the rocket that come together to make the system work. Each part has an important job. The nose provides the aerodynamics to help the rocket move through the air. It also contains the recovery system. The shock cord is made of rubber so it will flex upon ejection and not rip the body of the rocket. The wadding prevents the ejection charge from burning the parachute. The engine provides the thrust, delay, and ejection charge. The fins keep the rocket heading upwards and straight.

Math
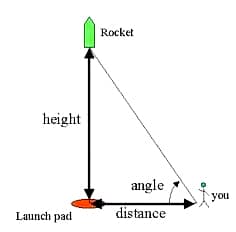
There is plenty of mathematics involved in the launch as well. Knowing the distance you are standing from the launch pad and the angle from your position to the rocket’s highest point, one can use basic trigonometry to calculate the height your rocket achieved. There are rocket trackers for sale, but you can make your own from a protractor and weighted string. Use the formula tangent of the angle of elevation is equal to the height (unknown) divided by the distance from the launch pad. Once you are comfortable calculating the approximate height of the rocket, next try to calculate its average velocity. Have a stopwatch handy and click off the time from the launch to the apogee. Then divide the height by the time to calculate the speed (feet per second). Extend the lesson to investigate other types of rockets that your class can build like water bottle rockets, straw rockets, Alka-Seltzer rockets, etc. Have students research who Sir Isaac Newton was, write about their model rocketry experience, and reflect upon some other forces that affect us.
Check back soon for more of my integrated S.T.E.M. lessons here on the Plymouth Rock Teachers’ Lounge.
Christopher Masullo, Ed.D.


