The Ultimate Guide to Getting Started On Teachers Pay Teachers
For decades, teachers have been silently creating amazing content for their classrooms. No outlet existed for them to share with other educators in the country, state, or even their own area. Then Teachers Pay Teachers (TpT) came along and changed everything! The hard work you put into your lesson plans, printable worksheets, and homework assignments can now be monetized as a nice side hustle or full time job, depending how far you go with it.
What is TpT?
If you haven’t checked it out yet, Teachers Pay Teachers is a website for teachers, by teachers. It’s a marketplace to sell worksheets and printables to other educators throughout the country. As a seller you simply create a worksheet one time, and then collect payouts over and over again. It’s a great way to make extra money from the work you are already doing for your own classroom.
A Successful TpT Example
NJ Teachers’ Lounge readers may remember that we recently highlighted a teacher who is making a good side income with her YouTube channel and TpT account. Hillary Seides of Teaching Without Frills is a great example of an educator who really enjoys helping students and equipping teachers through her work online. If you didn’t see our interview with her, you can check it out here: https://plymouthrockteachers.com/teacher-behind-teaching-without-frills-youtube-channel/.
Without further ado, let’s get started. Here’s what you need to do…
Getting Started
Creating an account on TpT is simple and free. Once you sign up you can begin adding your products and earning money. In this guide I am going to walk you through exactly what to do to make an account, get started selling, plus provide you with tips for how to create great content.
Step 1: Sign up
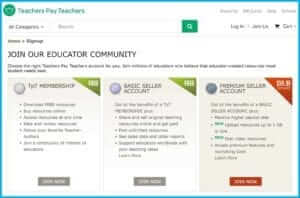
To sign up, simply choose the option that best fits your needs. To start out, you will probably want to stick with the basic seller account, which is free. This gives you access to the TpT membership, allows you to sell your products, and lets you view data and reporting for your products. The premium seller account is a great option for teachers who are already making money on TpT and want to spend less in fees for each transaction.
Step 2: Create your basic seller account
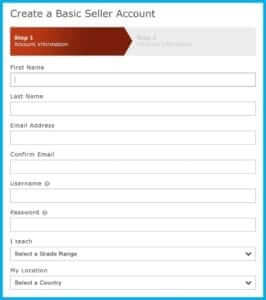
You will need to enter your name, email address, create a username and password, select the grade you teach, and your location.
Step 3: Enter your personal information
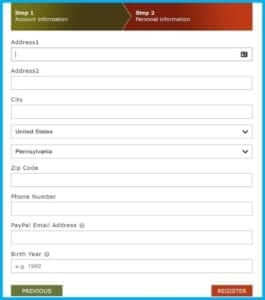
This screen will ask you for your address, phone number, PayPal email address, and the year you were born. Then simply click “register” to go on to your new back office and to choose your teacher store name.
Step 4: Fill out your profile
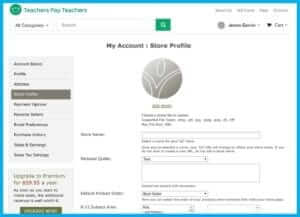
Now is the time to choose your teacher store name. Take your time and really think this through. Choose a name you like and will stick with. This can be your name, your blog’s name, or any name you like. Creating content for TpT is a great way to also promote your blog, if you have one. Creating one is not as difficult as it sounds. I have outlined a few tips and tricks on this here: https://www.virtualfreelanceguide.com/creating-a-blog-portfolio/.
If you have a blog or YouTube channel into which you are planning to incorporate the store, then it would be wise to name it the same name. For example, if your YouTube channel is “Teaching My Way,” you probably want to name your store the same name. That way you can use your current branding and seamlessly relate it to your current audience.
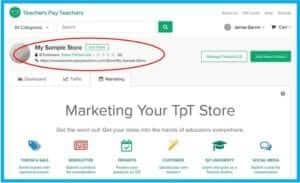
Whatever you name your store will become the URL used to view the products you have for sale. You can refer to the red circle in the graphic above. I named my store “My Sample Store” and my new URL that I could share is “www.teacherspayteachers.com/store/my-sample-store.” The reason it’s so important to choose a name you like enough to stick with long term, is that because changing your name will change the link. If you have already promoted your store on Pinterest, Facebook, YouTube, blogs, and any other social network, those links will be invalid if you change the name.
Next, you will need to add in a personal quote. I recommend browsing through TpT to see what other sellers are doing, but be original. Just a simple one-liner is all you need.
The third item to decide is the order in which your products will show on your store page. Teachers Pay Teachers allows you to choose what shows up first. For example if you have best sellers (items that you sell the most of) you may want to list those first because they have great reviews. As a new store owner just starting out, that may not be the best option. The other choices are: most recent, rating, price, or alphabetical. You really can’t go wrong with this, especially at the beginning. Choose the one that works best for you.
The last few areas are all about you. These will vary depending on your teaching background, skills, experience, etc. The selections are as follows:
K12 Subject Areas for TpT
Arts
Art history, cooking, dance, drama, graphic arts, instrumental music, music, music composition, visual arts, vocal music, other (arts), other (music)
English Language Arts
Balanced literacy, close reading, creative writing, EFL – ESL- ELD, ELA test prep, grammar, informational text, literature, phonics, poetry, reading, reading strategies, short stories, spelling, vocabulary, writing, writing essays, writing expository, other (ELA)
Holidays/Seasonal
Autumn, back to school, black history month, Christmas/Chanukah/Kwanza, earth day, Easter, end of year, Halloween, Martin Luther King Day, Presidents’ Day, spring, St. Patrick’s Day, summer, Thanksgiving, The New Year, Valentine’s Day, winter, women’s history month
Math
Algebra, algebra 2, applied math, arithmetic, basic operations, calculus, decimals, fractions, geometry, graphing, math test prep, measurement, mental math, numbers, order of operations, place value, statistics, trigonometry, word problems, other (math)
Science
Aanatomy, archaeology, astronomy, basic principles, biology, chemistry, earth sciences, engineering, environment, forensics, general science, physical science, physics, other (science)
Social Studies
African history, ancient history, Asian studies, Australian history, British history, Canadian history, civics, criminal justice – law, economics, elections – voting, European history, geography, government, middle ages, native americans, psychology, U.S. history, world history, other (social studies)
Specialty
Career and technical education, character education, child care, classroom community, classroom management, coaching, computer science – technology, critical thinking, early intervention, family consumer science, for administrators, for all subjects, gifted and talented, handwriting, health, instructional technology, international baccalaureate, library skills, life skills, occupational therapy, oral communication, physical education, physical therapy, problem solving, products for TpT sellers, professional development, religion, robotics, school counseling, school psychology, special education, speech therapy, student council, study skills, test preparation, tools for common core, vocational education, other (specialty)
World Language
American sign language, Arabic, Chinese, en Francais, Gaeilge, German, Hebrew, Italian, Japanese, Latin, Portuguese, Russian, Spanish, other (world language)
For all subject areas
For educators who are not K-12 teachers, you will select either university discipline or adult education that is appropriate for your skill set. The next question is about the grade level you teach which has selections for preschool, higher education, K-12, homeschoolers, etc.
Lastly, the remaining information is up to you to decide how much (if any) you add to your store profile. This is where you can list your experience, teaching style, honors/awards, your education history, and any additional biographical information.
Step 5: Upload your store photo
Before you hit save on your profile and begin uploading your first product, you need to upload your Teachers Pay Teachers store photo. This can be a photo of you, your logo, or anything relevant to your teacher store. A wonderful free tool that you can use to create your logo is Canva. Simply go to www.canva.com and select a free account. You will then see the option to create a logo. This totally free program is also a great tool to use for a blog if you decide to create one. You can make graphics for social media, ebooks, email marketing campaigns, etc.
Step 6: Create your very first product
There are many ways to create content for your Teachers Pay Teachers store. Two of the easiest ways are by using PowerPoint or Publisher. Since you most likely already have content to use because you’ve created worksheets for your own students already, then you can simply save your file as a secured pdf, or recreate it using the tools I just mentioned.
A few things to keep in mind when designing your products…
Font is not only important, it is essential. Having a great looking font will sell your products for you. Be creative. Before using any graphics or fonts make sure you are using ones that can be used for commercial use. That is the key phrase you are looking for. If they are not allowed to be used for commercial use, you could end up with a big problem down the road.
There aren’t too many guides out there to help you with creating content. One really great (and free) guide is by Erica Bohrer from EricasAdventures.com. Erica is a teacher, blogger, and contributor on TpT. As a highly rated contributor she has many wonderful tips to share on her blog.
If you’re wondering what kind of money someone can make from a $3 printable product, the answer is a lot! Erica said, “With the extra money I make from TpT, I don’t flinch about buying supplies for my classroom. I have the best classroom library around. Other teachers come to me to borrow books! I love that I can help them, too.” A few months ago, the Plymouth Rock Teachers’ Lounge did an article about great summer jobs for teachers. You may remember we listed TpT as one of the options. The amount of money you can make is pretty ridiculous. The top seller has made over $2MM, while nearly 200 teachers have earned over $50,000. (Read the full article here: https://plymouthrockteachers.com/upgrade-your-summer-job-9-ideas-teachers-should-consider/).
Tips for creating your content on Teachers Pay Teachers
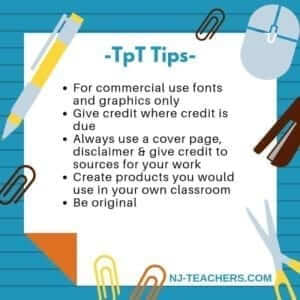
- Only use fonts and graphics that are allowed to be used for commercial use.
- Give credit where credit is due on all of your products – listing out fonts, graphic sources, etc.
- Your products should all contain a cover page, disclaimer, sources/credit, and then the actual printable.
- Create products you would use in your own classroom.
- Be original and do not attempt to copy another TpT seller.
- Blogging is a great way to get more traffic to your teacher store.
- Save your product as a secured pdf so that it cannot be manipulated or changed.
The biggest question you may be asking yourself right now is, how in the world do the sellers get those cartoon looking characters for their products? No, they aren’t amazing at Indesign (though some may be). There are several places to get really awesome cartoon-like graphics that you can use. The first is the TpT back office. After you create your account you will have access to fonts and graphics on the TpT platform. Take advantage of those as they are completely free to use.
A second option is on TpT as well, but it’s not free. You can actually purchase graphics from other sellers. It’s a nice way to support your fellow teachers and also get amazing graphics you can use again and again. Some educators have created their entire store around helping other sellers, which is always an option for you if you are really creative and good at making graphics.
Pricing Your Products
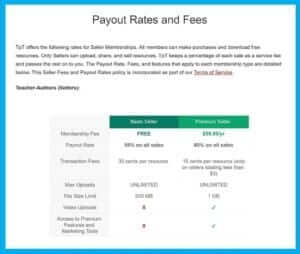
Choosing a price for your product will require you to research your competition. If you made a one page math worksheet for first graders, look at other elementary math worksheets to see how much they are selling for. You have complete control over the price of your product, but remember you also have to pay TpT a seller fee for every transaction. See the above screenshot to see what those fees are.
Should I Form a Business and Get an EIN?
As a seller on Teachers Pay Teachers you are not an employee. At the end of the year TpT will send you a 1099 for any income earned on the platform. Regardless of how much money you earn, creating an organization like an LLC or corporation is not necessary. You are always welcome to do so, but you can submit all of your earnings and tax write-offs as a sole proprietor. Many times sole proprietors get a TID/EIN that they can use for their business so they don’t have to give out their social security number. You can easily do that by going to the IRS.gov website. It is free to do so, and you can get one instantly.
Speaking of taxes, make sure you keep good records for everything you purchase for your seller account, teacher store, blog, etc.
TpT Seller Tax Write-offs
- Your home internet
- Blog fees – hosting and URL (domain name)
- Graphics and fonts
- Computer
- Printer
- Paid version of TpT, if you decide to use it
- Part of your house if you have a home office
Teachers are some of the hardest working people on the planet. You spend so much time creating math worksheets, holiday printables, and word searches for your students. Now, you can also monetize your hard work by placing those worksheets and printables for sale on Teachers Pay Teachers. Take advantage of this easy way to earn money for the work you already do. As you create your store, one way to get ratings and reviews is to offer a free product or two that people can download. Once you’re established you can remove those free items whenever you decide to do so. What are you waiting for? Go sign-up now!
Jenna Garvin has over 12 years experience as a freelance writer, blogger, and virtual assistant. She makes a living working from home and has even created a website to help train others who are looking to do the same. Her website Virtual Freelance Guide was created as a way to share her knowledge of those three great career opportunities with others.


